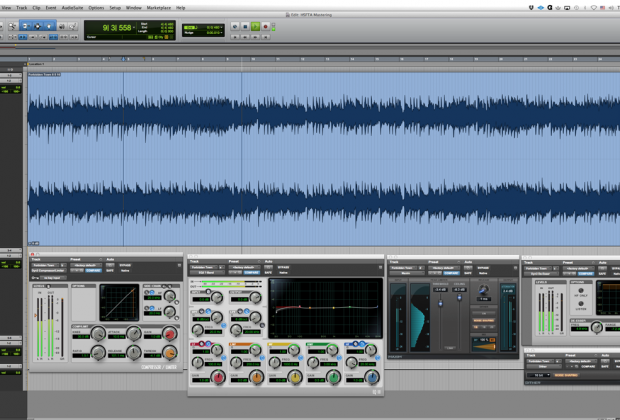
While we would all prefer to have our mixes mastered by a highly skilled, experienced mastering engineer in an acoustically tuned room on expensive top quality analog equipment, there isn’t always the budget for this. In these instances it is essential to know how to properly master your own music; you have too much at stake to risk having your music dismissed––perhaps by a TV show’s music supervisor who was wild about your new song––because the audio was un-mastered and, as a result, deemed unsatisfactory.
1. Leave some headroom in your mixes
Before we get to the mastering, let’s talk about mix levels. Avoid any clipping on your mix bus/main output (or, master fader in Pro Tools) and even try to leave a few dB’s of headroom (the amount of volume available before clipping). Temporarily bypass any plugins on your mix bus, and make sure there is headroom available. Be sure to do this in the song’s loudest section, where clipping is most likely to occur. If there is clipping, lower all audio/midi channels equally until the clipping stops. While it’s okay to lower the mix bus fader a dB or so, any more can cause gain structure problems, elsewhere in the mixer. In addition, I don’t recommend using brick-wall limiters to eliminate clipping.
2. Gain is best applied in stages...Don’t master while you mix
Some producers/artists like to use limiters on their mix bus. As an engineer, I think it’s preferable to wait and apply it to a bounced/printed stereo mix at the mastering stage. Gain is best applied in stages, much the way paint is best applied in coats. If you apply a light coat of paint, let it dry and repeat three times; you will achieve a smoother and more even finish than if you apply one very heavy coat. Compression works much the same way. In addition, when mastering a multi-song project, you may need to apply different amounts of gain to each stereo mix to ensure they are all consistent masters. You wouldn’t have this foresight at the mix stage.
3. Don’t Rely on Presets
Presets are worth trying but they can be very hit and miss due to the fact that a preset can’t consider the tone, dynamics or imaging of the source, the mix.
4. Get Your Ears On
It’s always a good idea to listen to some outstanding mixes in the genre to calibrate your ears to the day, the speakers and the room. These reference points will help you better judge the tracks you’re working on.
5. Set Your Ceiling
Brick wall limiters are different than other limiters in that they have an output ceiling that can prevent peaks from clipping (by heavily compressing them). Since clipping occurs at 0 dBFS, I usually set an output ceiling of -0.3 dBFS. This leaves a buffer against any potential distortion that can occur when converting to mp3. Since the limiter is what prevents any clipping, it should always be last in your plugin chain.
6. Watch Your RMS Levels
Put a level meter on the main output set to RMS for a true measurement of each master’s level. This will help ensure consistency between masters and prevent you from pushing things too far. I recommend trying to achieve RMS levels between -12 dBFS and -6 dBFS at the loudest points of the song. Consider the genre and feel of the music. The louder you push it, the more you are shrinking the dynamic range. This will have diminishing returns, especially with more relaxed/chill music.
7. Audition Different Limiters
Different limiters can affect the dynamics, frequency balance and imaging differently. For example, one may make the bass more pronounced and another the cymbals. I like to try different ones and pick the one that either sounds the most transparent or complements the mix best. Be sure to adjust the threshold or gain parameter to match the amount of gain reduction on each limiter. Otherwise, you may likely just choose the loudest one.
8. Don’t Over-Compress
I don’t always need to add more compression when mastering. My hope is it can add some extra cohesion and excitement to the mix and pull it forward slightly; however, if I feel that the music sounds less open, I may forego using the compressor. Remember, you are compressing your entire mix, so you don’t want to do too much. Here are some recommended ranges to stay within:
• Gain Reduction: .5 - 2 dB's is usually enough.
• Ratio: 1.5:1 - 3:1
• Attack Time: 10 - 50 ms
• Release Time: 50 - 300 ms
• Soft Knee
9. Let’s Outline a Few Practical Goals When Applying Mastering EQ:
• High pass filter around 20 Hz. There usually isn't anything useful that low and it’s using headroom and hence, volume.
• Alter the overall frequency balance/tone of the master. Reference some favorite mixes in the genre.
• Make all the songs in your project sound consistent in tone.
• Accentuate/de-accentuate a particular instrument. Listen closely to how this affects other instruments in the frequency range you’re manipulating. For example, guitar and snare or, bass and kick.
10. Dealing With Intermittent Frequency Problems
When encountering intermittent frequency problems, like feedback, sibilance, harsh cymbal crashes or lead guitar, try using a de-esser or one band of a multi-band limiter to address just that small frequency range. This can be preferable to EQ by only cutting that specific frequency range when it exceeds a certain threshold, leaving it unaltered the rest of the time, when it isn’t a problem.
11. Dither When Lowering The Bit-Depth of Final Masters from 24 to 16bit
When lowering the bit-depth, we reduce the dynamic range, resulting in rounding errors we perceive as distortion, and a loss of very low-level signals...Dithering essentially reduces this distortion and preserves as much dynamic range as possible.
 ERIC CORNE is an award-winning producer/engineer with top 5 Billboard Blues albums to his credit. He has recorded Glen Campbell, Lucinda Williams, John Mayall, DeVotchKa, Joe Bonamass, Walter Trout, Nancy Wilson (Heart), Joe Walsh and Kim Deal (the Pixies). His music has been used in film and TV shows (HBO’s True Blood), and trailers for Underworld 2 and Sony’s Resistance 2. In 2013 he started Forty Below Records, distributed by Sony RED. He also teaches recording at The Musician’s Institute and recently co-authored the industry guide book, Five Star Music Makeover, published by Hal Leonard Inc. See ericcornemusic.com.


